Showing posts with label Android Tips. Show all posts

Tuesday, 11 November 2014

Amazing Ubuntu Styled Sidebar Dock

Amazing Ubuntu Styled Sidebar Dock

If you are a hardcore fan of Ubuntu then you must have known that a new responsive Ubuntu OS has been designed for mobile phones and is being released soon.The best feature of the Ubuntu OS is that it has a sidebar panel or dock which allows multitasking further easier.A good news is that the Android users can now add a customized Ubuntu styled sidebar dock in their mobile phones."Glove Box" is the application that will replicate the design of the dock which was developed by a member of XDA Developer. 


Adding Ubuntu Styled Sidebar Dock in Android :

Get the GloveBox application from the playstore link(Click Here) and install it. 

You won't see any changes on your mobile until you set the application shortcuts inside the "Bar Contents" .To do so open the Glovebox application and select Bar Contents. Add your favorite applications and come back to your homescreen. (You can avoid this but homescreen gives you good visibility) 


Slide the top left of your screen and you must see the added applications in the sidebar.Hold on to your finger and move it up and down to navigate through the applications.I'm sorry you can have upto 8 applications only in free version. 

To change the place on the screen to trigger the application you must select "Configuration" and then "Edit trigger area". 


Set the desired size on the screen to trigger the sidebar.Make sure you keep minimum sensitivity level else the panel wouldn't appear. 


You can select your favorite theme for the sidebar out of the available themes.Just click on your desired theme and it's automatically added. 


The sidebar panel can be opened on any active screens and will be helpful to perform multiple tasks on your powerful android phones. 


Sunday, 26 October 2014

FREE Unlimited Talk Time FOR ANDROID USER

FREE RECHARGE FOR ANDROID USER


RECHARGE OF " Unlimited Talk Time" FREE
Follow Just Simple Steps And Get Your Talktime. FOR ANDROID USER
Download Link :  ladooo.com/1162779685
Steps Of Register :-
1. Select Sign Up With Number
3. Enter Mobile Number
5. Verify Your Number
Note :- This offer is for every network


FREE Unlimited Talk Time FOR ANDROID USER

FREE RECHARGE FOR ANDROID USER


RECHARGE OF " Unlimited Talk Time" FREE
Follow Just Simple Steps And Get Your Talktime. FOR ANDROID USER

Download Link :  ladooo.com/1162779685
Steps Of Register :-
1. Select Sign Up With Number
3. Enter Mobile Number
5. Verify Your Number
Note :- This offer is for every network


Thursday, 23 October 2014

10 Useful Android Tips And Tricks You Should Know

10 Useful Android Tips And Tricks You Should Know

1. Disable App Notifications

Bugged by annoying app notifications that just keep coming? If you don’t know already, these app notifications also drain your phone’s battery. If you want to turn them off, and you are on Jelly Bean 4.1 and above, here’s how:
  1. On any of your unwanted notifications in your notification bar, long press on the notification for a message box to appear.
  2. Tap on App Info > Untick Show Notifications > OK.
Disable App Notifications

2. Disable Mobile Data

Whenever you don’t need to stay connected, disabling the Mobile Data can help keep your smartphone battery from draining too quickly. Turning off mobile data is as easy as:
  1. Going to Settings > Data Usage.
  2. Disable Mobile data by toggling the setting from ON to OFF.
Disable Mobile Data

3. Set Mobile Data Limit

Want to keep track of how far your usage is from your monthly mobile data limit? If you have ICS and above, there is a feature which lets you keep track of how much of the quota you have left.
  1. Head over to Settings > Data Usage.
  2. Set your data limit by dragging the orange line to reflect your monthly quota.
  3. Set your data usage cycle based on when your "month" starts and ends, and you’re done.
You will be alerted once you hit the limit you have set. Note that the tracked data usage of your phone may vary slightly than your carrier’s tracking.

4. Add Multiple Google Accounts

You need a Google account to use an Android phone but did you know you can choose to run more than one Google account on your Android device. This is convenient if you use more than one account for several of your Google services. To add multiple Google accounts:
  1. Go to Settings > Add account.
  2. Select Google and setup your New or Existing Google account.
  3. Once added, choose what you want to sync with the account.
Repeat all the steps above if you want to add more accounts.
Add Multiple Google Accounts

5. Disable Automatic App Updates

Prefer to read through app permissions and manually pick which app updates to adopt? You can, but first you need to disable your automatic app updates. Here are the steps:
  1. Open Play Store and head over to Settings.
  2. Tap on Auto-update apps.
  3. Choose Do not auto-update apps.
If you want to enable the auto updates, follow the same path and choose Auto-update apps at any time or via Wi-Fi (available for certain Android devices only).
Disable automatic Apps Updates
To update your apps manually, just open Play Store, and on the main page swipe in from the left and tap on My apps. You can tap on apps with pending updates and update them manually, or if you like to update them all at once, just tap on Update All.

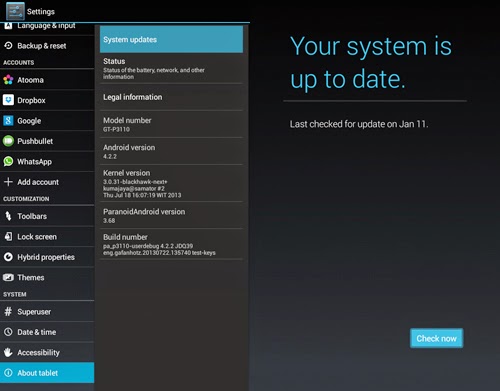
  6. How To Check For Android System Updates

For Android users that are using stock ROM, you may want to look for new updates to your system. To check for updates:
  1. Go to Settings > About phone/tablet.
  2. Tap on System updates.
  3. Tap Check now to look for system updates.

7. Changing Default Apps

If you have already set some default apps for particular tasks (e.g. using Chrome for opening web links) but wish to change this:
  1. Go to Settings > Apps.
  2. Swipe right and look for the All tab.
  3. Select the app you want to remove as default.
  4. Tap on Clear defaults.
Changing Default Apps

8. Organize Homescreen Shortcuts With Folders

Once you have a lot of apps installed, your homescreen might be filled with app shortcuts. Unlike the app drawer, the apps on your home screen are not arranged alphabetically. So, you might want to create some folders for your homescreen shortcuts.
  1. Assuming you have more than a handful of shortcuts already on your homescreen, long press on any of the shortcuts and drag it onto another shortcut.
  2. A circle should now appear around the apps, indicating that a folder has been created.
  3. By tapping on the newly created folder, a mini window will pop up with your apps in it.
  4. You can drag and drop additional apps into the folder if you like. You can also rename the folder by tapping on the text area at the bottom of the mini window.
Organize Homescreen Shortcuts With Folders

9. Disable Animations

Here’s a tip on how to make your Android device run a bit smoother: disable its animations. You will need to have access to Developer Options which can be found under Settings orAbout device.
Note: For some phones, you may need to go to Build number and tap on it repeatedly until you see "You are now a developer!". Developer options are now enabled.
Under enabled Developer options, look for Window animation scaleTransition animation scale, and Animator duration scale. Then, turn them off (disable) them one at a time.
Disable Animations

10. How To Turn Off Auto-Correction

Hate the fact that your phone is going English teacher mode on you? Turn off auto-correction for peace of mind when texting.
  1. Go to Settings > Language & input.
  2. Tap on the settings icon next to the keyboard that you are using, e.g. Google Keyboard.
  3. Look for Auto-correction and tap on it.
  4. Select Off to turn auto-correction off.
Turn Off Auto-Correction

Get Android L Style Notifications on Your Android Device with Floatify app

Get Android L Style Notifications on Your Android Device with Floatify app


One of the most interesting features of Android L demos in Google I/O 2014 is the newly designed notifications, where a notification floats on top of everything else on your screen and you can either swipe it to dismiss it or tap it to respond. You will also be able to interact with them.
If you’re one of those who can’t wait till Android L becomes available or your device is not getting the Android L update, there’s an app called Floatify that can give you a preview of what it will be like.
Floatify is a new Android app that brings the same Android L style notifications to your Android device. You don’t need to root your phone to get the new notification system. The only requirement is the device must be running on Android 4.3+ or above because the older versions don’t support the floating feature.
Once installed and enabled, when you receive a notification, a summary appears on the lock screen. You can tap on it to see the full notification, or swipe to dismiss. You can also add bulk actions, like dismiss all notifications, to your home screen, to make life easier.
The app let you customize the style of notification, like where the pop-up will appear, animation, background, etc. You can also change the notification background color, size, position, opacity, text, icons, and more.
floatify screenshots
If you find notifications annoying when you’re playing a game or watching a video, there’s a ‘Smart Blacklist’ option that lets you disable notifications for selected apps. These notifications will reappear as soon as you close that app.
This app has both free and paid versions. The paid version will unlock all features like Smooth animations, Unlimited text filter words, Quiet hours, Wake screen on notification, Custom timeout settings for popup, Privacy settings for apps, Icon pack support, Backup & restore functionality, and much more.
If you want to enjoy the new Android L style notifications on your device, then Floatify is the best app for you.

Top 5 Free Note Taking Apps for Android

Top 5 Free Note Taking Apps for Android

Smartphone is the perfect note-taking device that you can conveniently carry around wherever you go. Instead of wasting paper and taking an extra item with you on the go, you can just use your Android device to take notes and store them for future references.
Although Android devices don’t have a built-in note taking app, but there are a plenty of third-party note apps available for Android phones and tablets. Most of these apps have a lot of great features to better organize your notes, and many of them work on multiple platforms, allowing you to sync and take your notes wherever you go. To get you started, here are five best note taking apps that you can try out for free.
  1. 1. Evernote
    Evernote is one of the most well-known note-taking apps for Android. With this app, you can do a number of functions like taking notes, keeping to-do lists, recording voice memos, and organizing notes, and much more.
    You can also add images, audios and videos into the notes you create. All the notes can be synced across different platforms, allowing you to have access to all your notes no matter what device you own or work from.
    What makes it even better is that it lets you add handwriting and sketches to your notes. You may also add tags to your notes and make them more organized. Sharing notes via Facebook or Twitter could also be a handy option. There’s also a Premium version with additional features like pascode lock, offline notebooks, document search, etc.

    1. 2. Google Keep
      Google Keep is a simple note taking app created by Google to help you make short notes and set to-do lists. With this app, you can add images, sounds or even videos to the note.
      One of the best features of Google Keep app is that it allows users to add different colored notes, making easier to categorize and find them later. Like the Evernote, this app also enables you to sync all your notes across multiple devices.
    2. google keep screenshots
      1. 3. SomNote
        SomNote is a beautiful note taking app that allows users to create multiple notes and manage them in nice color-coded folders. Users have the ability to attach media files to their notes, making notes more personalised and useful.
        The SomNote app offers free 100MB storage for storing files that are attached with the notes. Another great feature of this app is that it features privacy options that enable users to protect the notes which have their personal information.
        With SomNote, you can even share your notes on Facebook and Twitter. It also has a keyword search so you can easily find the note you need.
      2. somnote screenshots
        1. 4. ColorNote Notepad Notes
          Colornote is a simple note taking app that provides sticky note widgets to give you quick access to your notes from home screen. Like the Google keep, this app allows users to color-code their notes and set to-do lists. It also let you scribble notes on a stylized notepadand you can organize it by color or category for ease of access.
          Other features of ColorNote include password lock note, backups to SD card storage, search notes, share notes via SMS, email, Twitter, and many others.
        2. colornote screenshots
          1. 5. Any.Do Task List & To-do List
            Any.Do is another great note taking app for Android. With this app, you can create notes, set to-do lists, reminders, and events. It also gives you the option to attach notes to your tasks and put them into folders that you’ve created. You can easily drag and drop the tasks in various categories, and share them with your family, friends, or colleagues.
            The great thing about Any.Do is that it allows you to remove all completed task by just shaking your phone. You can use the speak feature if you do not want to type. Just tap the microphone icon and say what you want to do, and Any.do will automatically convert your words into text in almost any language.
            Any.Do comes with two themes – white and black background – so you can personalize the app to suit your taste.
          2. any.do screenshots

5 Best Free File Manager Apps for Android

5 Best Free File Manager Apps for Android

  1. ES File Explorer
    ES File Explorer is one of the most popular file manager apps available for Android with over 100 millions downloads on Google play store. It is a multi-functionality app that consists of file manager, download manager, system manager, remote manager, root explorer and much more.
    This app provides tons of tools for file management, including Cut, Copy, Paste, Move, Create, Delete, Rename, Hide, Send, Search, Share, etc. It also offers tools that can be used for archiving and compressing files.
    In addition to that, ES file explorer supports cloud services, like Box, Dropbox, Google Drive, SkyDrive, and more, so you can back up your files to the cloud, and sync them among all your mobile devices. The other good thing about this app is that it is totally ads free.
  2. ES file explorer screenshots
  3. ASTRO File Manager with Cloud
    Astro File Manager is one of the best file manager app for Android that lets you manage and organize all your files regardless of where they are stored (in a cloud or on your device). It has the robust technology to easily search for files in the Android device, giving you the ability to find the file you want using keywords, or narrow your search down to only specific locations on your device’s memory.
    Furthermore, this file manager comes with a unique feature called ‘CLOUD HOPPING’, which lets you move files from one cloud platform to another in a single copy and paste – without having to download them first before sending to your destination cloud. It supports all major cloud services, like Dropbox, Box.net, Google Drive, Facebook, and OneDrive.
    The app also has a built-in image viewer to open images, PDFs and even text-viewer. Other features of Astro file manager include app backup, app manager, download manager, task killer, networking, and SSH File Transfer (SFTP).
  4. astro file manager screenshots
  5. X-plore File Manager
    X-plore file manger is an easy to use file manager app that supports dual-pane tree view, which allows you to view two folders at once. With the help of dual-pane view, you can easily copy and move files from one folder to another and perform basic file management operations.
    The app also allows you to access to cloud storage, Picasa albums, browse SQlite database files, zip and unzip files. Other features include application manager, built-in image viewer, hex viewer, wifi file sharing, SFTP.
  6. x-plore file manager screenshots
  7. Ghost Commander File Manager
    Ghost Commander is a dual-panel, customizable file manager app which allows you to easily copy and move files from one panel to another. This app offers all the standard tools of file management like create, copy, move, rename, delete, etc.
    Beside the basic features, it also has cloud services, built-in FTP client, ZIP archive support and built in text editor. This file manager is very customizable and comes with a lot of options to customize the look and feel of this Android manager. You can change the color, font size, language and custom toolbar according to your preferences.
    The other interesting feature of this app is that it allows user to change file permission and even execute their own shell commands, it’s only possible on the rooted Android Smartphones.
  8. ghost commander file manager screenshots
  9. FX File Explorer
    FX File Explorer is a free file manager app that is designed to let you easily manage all content on your Android phone or tablet. This app has a very nice interface with plenty of features to handle most of your file management needs. There’s also dual pane mode which enable you to quickly switch between different locations.
    FX file explorer comes with built-in image viewer, hex viewer, text-editor, and cleaning tools for removing duplicates and viewing large files. It also can archive files or folders in most formats (zip, .tgz, .tar.gz, .tar.bz2, .7z).
    The only downside of this app is that it does not provide network connections and cloud services that the other free file manager apps do, but it does offer a paid “Plus” add-on which adds network and cloud integration as well as media management features. So if you need the functionality, you’ll have to purchase the add-on in the play store.
  10. FX file explorer screenshots
These are some of the best file manager apps currently available for Android.

The Difference Between Samsung Galaxy Note 4 and Galaxy Note 3

The Difference Between Samsung Galaxy Note 4 and Galaxy Note 3

Galaxy Note 4 vs Galaxy Note 3: Design

The Galaxy Note 4 comes with a whole new design that features a metal frame along with a curved front glass panel that is a departure from the plastic material used on its predecessors, giving it a premium look and feel. The metal-frame design also makes the Note 4 more durable. With its sleek metal design, the Note 4 beat the Note 3 in both looks and durability.
galaxy note 4 vs note 3: design

Galaxy Note 4 vs Galaxy Note 3: Display

Both Note 4 and Note 3 come with the same 5.7-inch Super AMOLED display, but the Galaxy Note 4′s 5.7-inch display offers Quad HD resolution (2560 x 1440px) with a pixel density of 550ppi, compared to the 1080p display and 430 ppi on the Note 3. That means the Galaxy Note 4 is a lot sharper and has a much higher pixel density than the Note 3.

Galaxy Note 4 vs Galaxy Note 3: Processor

Like its predecessor, the latest Note 4 also comes in two different variations – the Qualcomm Snapdragon processors and Samsung’s own Exynos ones.
The Galaxy Note 4 sports a quad-core 2.7GHz Qualcomm Snapdragon 805 or Exynos 5433 chipset while the Note 3 features a quad-core 2.3GHz Qualcomm Snapdragon 800 processor or Exynos 5 Octa 5420 chipset. Despite this, both the devices are backed by 3GB of RAM.

Galaxy Note 4 vs Galaxy Note 3: Camera

The Galaxy Note 4 sports a 16MP rear-facing camera with Optical Image Stabilisation (OIS). The Galaxy Note 4 also has a 3.7 MP front-facing camera that offers a default 90 degree shooting angle and up to 120 degree wide angle.
In contrast, the Note 3 has a 13MP rear camera and a 2MP front camera but it does not have OIS attached to it. In terms of video, both devices are equal, capable of playing 1080p video at 60fps and 2160p video at 30fps (for N9002 and N9005 series only).

Galaxy Note 4 vs Galaxy Note 3: Battery

In terms of battery life, the Galaxy Note 4 sports a 3220mAh battery while the Note 3 offers 3200mAh. Although the Galaxy Note 4 battery is slightly bigger than the Galaxy Note 3, it supports fast charging, which allows it to charge from zero to 50% in only 30 minutes of charge time.

Galaxy Note 4 vs Galaxy Note 3: Storage

The Note 4 offers 32GB on-board storage, while the Note 3 provides 32GB and 64GB on-board storage variants. Despite this, both the handsets support microSD cards up to 64GB and a 50GB of free cloud storage through Dropbox for 2 years.

Galaxy Note 4 vs Galaxy Note 3: S-Pen

The S-Pen on Note 4 has also gotten an upgrade. It is now has 2048 points of pressure sensitivity to the Note 3′s 1,024, getting a more precise response when you use it. Furthermore, a new S-Pen feature called ‘Smart Select’ lets you capture several pieces of content and dragged the items to use in an email or added to a notepad.
The table below provides a more detailed comparison between Samsung Galaxy Note 3 and Galaxy Note 4.
ModelGalaxy Note 3Galaxy Note 4
OSAndroid Kitkat 4.4Android Kitkat 4.4
Size151.2 x 79.2 x 8.3 mm153.5 x 78.6 x 8.5 mm
Weight168g176g
Screen size5.7 inches5.7 inches
Display1,920 x 1,080 pixels Super AMOLED, 386 ppi2,560 x 1,440 pixels Super AMOLED, 515 ppi
ProcessorQuad-core 2.3 GHz Qualcomm Snapdragon 800Quad core 2.5 GHz Qualcomm Snapdragon 805
RAM3 Gigabyte3 Gigabyte
Camera13 Megapixel / 2.0 megapixel16 Megapixel / 3.7 megapixel
Internal Storage32 / 64 gigabyte + microSD32 gigabyte + microSD
Battery3,200 mAh3,220 mAh
ConnectivityLTE Category 4, HSPA+, Bluetooth 4.0, IrDA, NFC, USB 3.0LTE Category 4, HSPA+, Bluetoth 4.1, IrDA, NFC, USB 2.0

Conclusion

The Galaxy Note 4 is a definite upgrade over its predecessor, offering a higher resolution display, an upgraded processing package, an improved S-Pen stylus experience, and a slightly different software experience with some new features. On other hand, the Galaxy Note 3 is still a very viable option for anyone who’re looking for a good Note experience, without wanting to pay for the latest and greatest.